Fuse boxes (a.k.a. electricity boards or fuse panels) are safety features designed to safeguard engine and dashboard components that run on electricity. They are typically found in-cabin underneath the steering column and in the engine compartment next to the battery.
A perfectly operational fuse box would equate to your car running without a glitch the moment you start it. But if something electrical in your vehicle stops working, knowing how to replace a fuse in a car becomes crucial.
A blown fuse happens from time to time. After all, a fuse will break if it detects overloading or a faulty circuit. While having a seasoned mechanic fix a blown fuse is ideal, it would not hurt to learn how to change a fuse in a car by yourself – if you have not already done so.
Here are 12 simple steps on how to replace a fuse in a car:
- Detach the battery cable
- Locate the vehicle’s fuse box
- Remove the fuse box lid/cover
- Disconnect the fuse box power supply
- Remove the fuse box housing
- Find the blown fuse or fuse puller
- Test the faulty fuse before removing it
- Remove the broken fuse
- Insert an amperage-matching replacement fuse
- Reconnect system wires
- Start the ignition and test
- Consult a professional mechanic for unresolved or recurring problems
A blown fuse could manifest in several ways – dash lights going off simultaneously, radio abruptly going dead, or windows stopping while rolling up/down (to name a few). Characteristically, telltale signs indicative of a faulty fuse happen suddenly. Gradually worsening symptoms may not necessarily be associated with a blown fuse. Still, it is always a good idea to side with caution and check.
How to Remove a Car Fuse and Replace It – 12 Steps
1. Detach the Battery Cable
Mishaps can happen, especially when dealing with your vehicle’s electrical system. First, make sure that your car is not running. Then, using a socket wrench like Hazet 854T Socket Wrenches (view on Amazon) or adjustable wrench, disconnect the negative terminal attached to the battery (set it aside where there is no contact with any metallic object). Doing this guarantees that no electricity will be running through the system as you inspect, test, and change any blown fuses. This step is especially crucial for vehicles equipped with a push-button start system.
2. Locate the Vehicle’s Fuse Box
Beginners need not feel intimidated when locating the fuse box or panel, as the service manual typically specifies its location. Most vehicles have their fuse panels under the steering wheel (or somewhere near it). However, the location of the fuse box varies from car to car. Moreover, not all vehicles have both an in-cabin fuse box and one that sits under the hood.
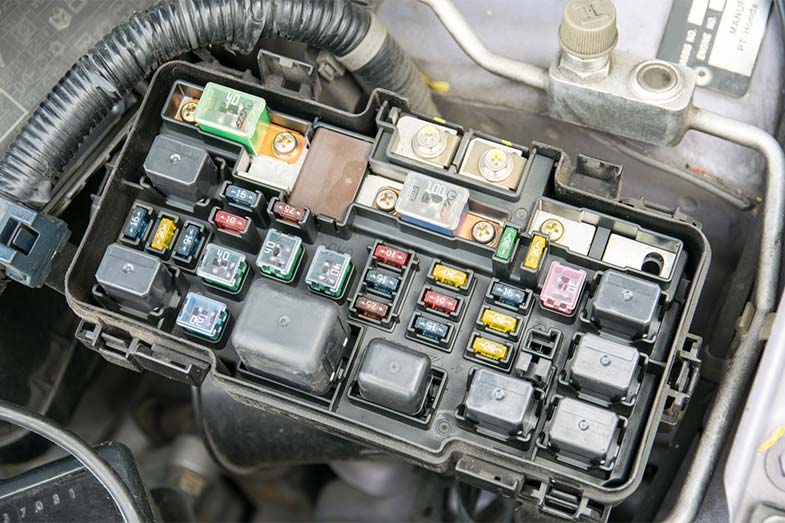
3. Remove the Fuse Box Lid/Cover
Turning over the lid of your fuse box should unveil a fuse diagram showing which fuse works with which electrical component – this is an excellent reference as you test and troubleshoot the blown fuse later on. Likewise, you will see several color-coded fuses with numbers denoting their specific amperage rating. These color codes and amperage ratings are utterly important to note, especially when you have already pinpointed the fuse at fault and are about to get it replaced.

4. Disconnect the Fuse Box Power Supply
This step usually only applies when needing to remove the entire fuse box. But to be doubly sure no live current is going through the systems, it would be best to disconnect the power supply once the fuse box lid is off and set aside. You may need to remove its housing first to access the wires, then circle back to the power supply before moving on. The fuse box power supply is most likely a single or set of red wires with a terminal connected with a bolt (looks pretty similar to a battery).
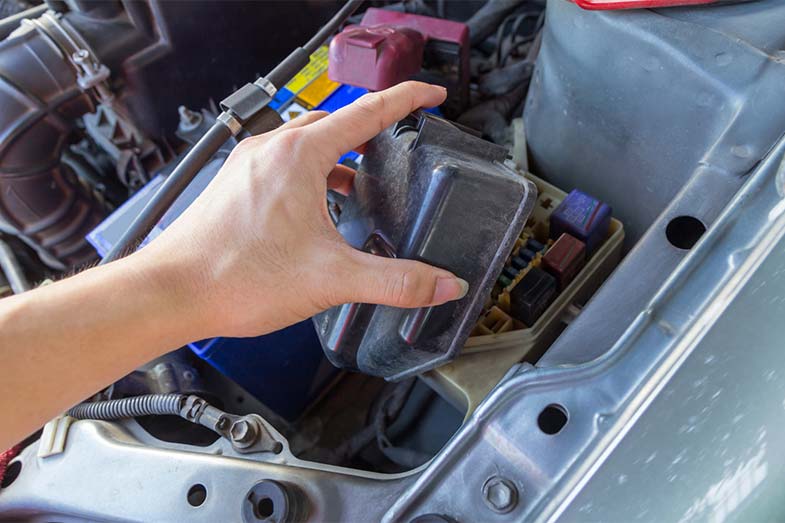
5. Remove the Fuse Box Housing
Depending on the problem, you may need to remove the fuse box altogether. Removing the fuse box housing (wiring harnesses and all) is key. Doing so exposes the many wires connected to the fuse box and routed to various systems and sensors that make vehicle components work. Tip: Tape and label them for easier reinstallation and preventing crossed wires.
Pay attention to the retaining bolts holding the fuse panel in place – they may be different lengths. So, keep an eye on the placement of each bolt as you individually remove them. Additionally, use a plastic bag/container or a magnetic tray to keep loosened bolts together until you need to use them to replace the fuse box housing to where it was.
6. Find the Blown Fuse or Fuse Puller
Refer to the diagram inside the fuse box lid/cover to locate the defective fuse. Once you have figured this out, visually inspect the fuse in question. Look at the metal filament and see if it is black, fused, broken, or burned through. The fuse looking anything like any of these descriptions would necessitate a fuse replacement.
If the defect is not visually apparent, test it with a standard automotive test light or a fuse-testing tool mostly available in auto parts stores. And in the event your vehicle’s fuse panel does not come with a specialized fuse puller, a pair of needle-nose pliers, tweezers, a very small standard screwdriver, or a bent paper clip will also serve the same function.
7. Test the Faulty Fuse Before Removing It
As mentioned earlier, it is advisable to test a suspected blown fuse before removing it. Do this by performing a continuity test using a multimeter/ohm meter. Using the two probes of the multimeter (view on Amazon), touch the small metal tabs on top of the fuse. See if there is continuity, or the fuse gives off a resistance reading ranging between 0 and 0.001 milli-ohm. If there is, and there are no signs of discoloration or damage to the fuse’s filament, then the fuse is good – meaning the component malfunction is something else.
8. Remove the Broken Fuse
Now to the good part. In extracting a blown fuse, you have various tools (including your hands) at your disposal. However, using a puller is ideal, as fuses tend to break easily and prove a lot more challenging to pull out when broken (as opposed to being fully intact). The approach to removing a fuse would also be dependent on whether your car has a blade-type or a glass-tube type. For the latter, it is best to try prying up one of the end caps first, then gently working your way until the entire fuse dislodges. Meanwhile, other fuse types may get by with a small, pinching motion.
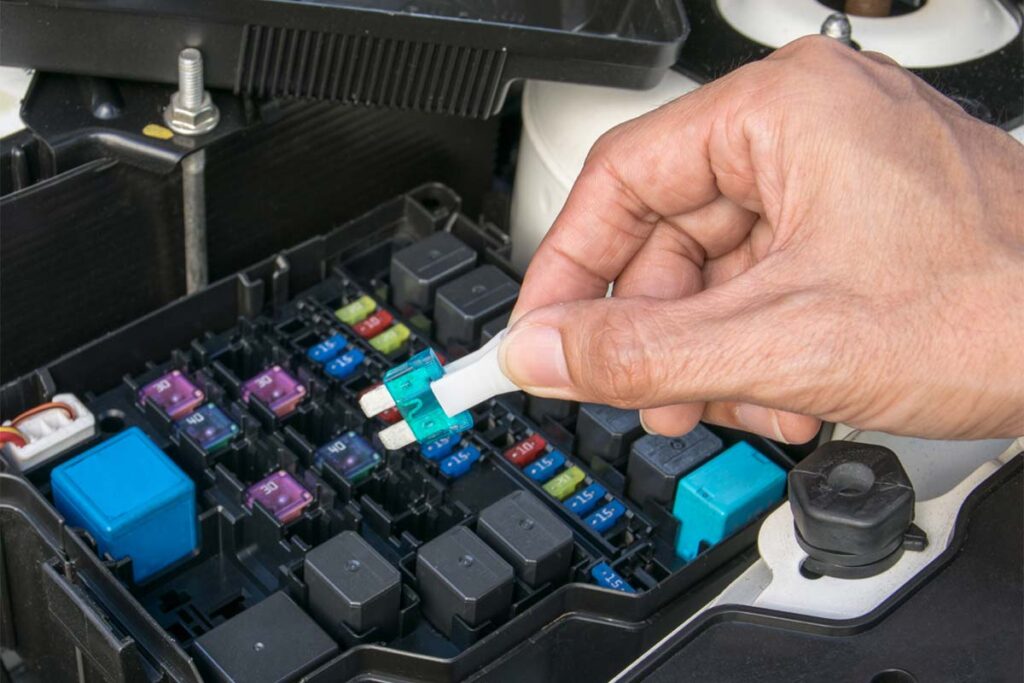

9. Insert an Amperage-Matching Replacement Fuse
When removing broken fuses, always refer to the service manual and the diagram in your fuse panel for guidance. More importantly, make sure replacement fuses are right-sized (color-coding adherent and with the exact amperage), as using a fuse with incorrect amperage can lead to dire electrical problems. As a best practice, bring the defective fuse with you to the auto shop for comparison when purchasing replacements.
Tip: Before you buy replacement fuses, make sure to check the fuse panel cover. It usually contains spare fuses and, sometimes, even a fuse puller. Additionally, never replace a defective fuse with a higher-amperage one, lest you will end up with more problems.
I also highly recommend stashing away extra fuses in your glove box. You should make the most out of that trip to the local auto shop by stacking up on spare fuses of different amperage ratings. This way, you do not have to take a fuse away from an infrequently used function when you find yourself in a pinch. Plus, vehicles generally have more than one component that requires the same amperage as another. If more than one of these same-amp functions breaks down, you might be in trouble.
10. Reconnect System Wires
Once you have completed how to remove a blown fuse from your car without a tool and installed the correct replacement, start reattaching the various wires connecting to all the components protected by the fuses. Work smartly – start with those in hard-to-reach areas, moving to easier ones last.
11. Start the Ignition and Test
After replacing faulty fuses and reconnecting wiring, turn your car ignition on and see if the problematic circuit is now corrected and working properly. The first ten steps enumerated in this list should easily fix temporary surges. But if the circuitry problem persists, you will need to carry out a further diagnosis to solve the problem permanently. Chances are there is an underlying issue that caused your fuse to go out, waiting to be addressed.
12. Consult a Professional Mechanic for Unresolved or Recurring Problems
You have already exhausted all the steps in this guide to perform a DIY fuse removal and replacement. But unforeseen events could happen. Sometimes, replacing defective fuses alone is not enough to solve seemingly minor vehicle problems. Especially for secondhand cars, they may have preexisting issues or sustained physical damage unknown to you at the time of purchase. You may be better off having your electrical systems professionally diagnosed and repaired.
Different Styles of Fuses
Collectively, there are at least seven different styles of fuses still in use in most vehicles. These fuse types differ in how they look and, hence, would need to precisely match with the correct fuse replacement. Each of these fuses requires a different dynamic when examined or pulled out of the fuse panel. To ensure you are buying the right replacement for your blown fuse each time, here are the most common fuse styles for your reference:
Blade Fuses
Introduced in 1970, this fuse style (otherwise referred to as a spade or plug-in fuse) is predominantly found in modern-day sedans and other on-road vehicles. It is mostly designed for 12V electrical systems, are color-coded, and have their amperage rating written on top. It ranges from 32V to 80V, with amperage ratings from 0.5A to 500A.
Under this category, there are four (4) fuse types, namely – micro (Micro2, Micro3), mini (APM, ATM), standard (APR, ATC, ATO), and maxi (APX). Standard blade fuses are typically found in cars and trucks, while maxi ones are in vehicles designed for heavy-duty applications. Add-a-fuses (a.k.a. add-a-circuit, piggyback fuse) also fall under this category.
Glass-Tube Fuses
Older wheelers have glass, cylinder-shaped fuses (a.k.a. fuse limiters or Bosch fuse) with stainless steel caps on both ends and glass showing the filament in the middle. Conversely, newer cars have a similar fuse style but with plastic housing instead of cylindrical glass encasing the fusible link. They range from 12V to 42V, are generally more delicate than blade types, and require greater caution when inspecting or pulling out of the fuse panel.
In-Line Fuses
This fuse style is common in electronic accessories that are not factory-installed, such as fog lights. It can be located under the dash, under the hood, or inside the trunk – depending on the circuitry or component the fuse protects. To determine if you have an in-line fuse, trace the wire from the aftermarket accessory through the fuse panel.
Conclusion – How to Remove Fuse From Car and Replace It
In summary, below are 12 simple steps on how to replace a fuse in a car:
- Detach the battery cable
- Locate the vehicle’s fuse box
- Remove the fuse box lid/cover
- Disconnect the fuse box power supply
- Remove the fuse box housing
- Find the blown fuse or fuse puller
- Test the faulty fuse before removing it
- Remove the broken fuse
- Insert an amperage-matching replacement fuse
- Reconnect system wires
- Start the ignition and test
- Consult a professional mechanic for unresolved or recurring problems
With the help of this guide, you should feel more confident removing and replacing bad fuses on your own. As long as you stick to recommendations in your service manual and ensure not to scrimp on promptly diagnosing the cause of a blown fuse, you’re good to go. Changing a fuse becomes much easier once you have done it several times. Your mechanic may not be thrilled about this newfound skill, but your pockets – and more importantly, your vehicle – certainly will.
Kris is an avid off-roader and outdoor enthusiast who loves to brave the elements and take on challenging terrain. He also enjoys sharing his passion and knowledge with others so that they, too, can appreciate the ride.
About Kris