Knowing how to add coolant to your car is crucial to keeping your cooling system functions in tip-top shape and engine troubles at bay. It is a relatively straightforward task that, when done right, can prevent your engine from overheating and save you a few bucks (or even a trip to your local mechanic).
This guide will loop you in on how to add coolant to your car correctly – among other things.
Steps on adding coolant to your car include using the correct coolant mixture, refilling the car through the overflow tank, and testing your engine after a coolant top-up for overheating problems. Newer vehicle models may require vacuum-filling the cooling system.
Here are steps on how to put coolant in your car:
- Let the engine cool down after turning off the vehicle.
- Find the radiator or coolant reservoir.
- Remove the radiator or coolant cap.
- Drain the old coolant (optional).
- Create your coolant mixture.
- Add your engine coolant.
- Replace the thermostat and radiator or coolant cap (recommended).
- Perform an engine overheating test.
- Double-check the engine coolant level.
- Check for any leaks.
Using the wrong coolant mixture for your car’s cooling system can lead to sludge, accelerated corrosion, and engine damage. These inconveniences make for an uncomfortable ride and turn the upkeep of your vehicle into a major hassle.
If you want to keep these troubles at bay and save yourself a few hundred dollars every time you change your coolant, continue reading this article.
How to Put Coolant in Car (10 Steps)
1. Let the engine cool down after turning off the vehicle.
Make sure your engine is completely cool. This can take a few minutes to half an hour, depending on ambient temperature and whether the vehicle was just used for driving. Your car should be cool to avoid severe scalding.
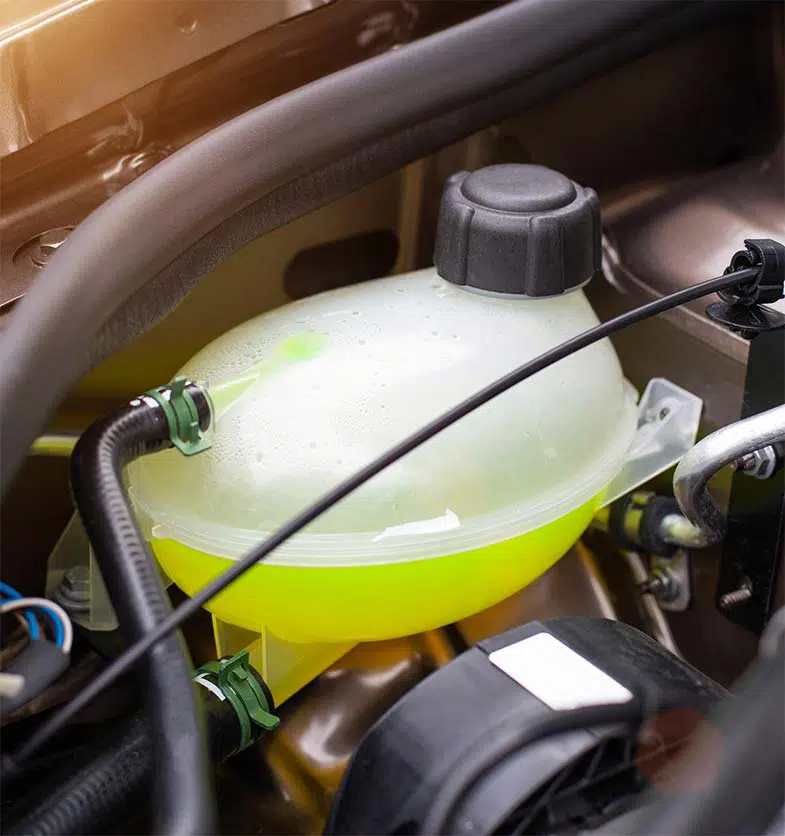
2. Find the radiator or coolant reservoir.
The coolant reservoir is a translucent-white container with a metal or black screw-on lid and hoses connecting it to the radiator. It is usually at the engine’s front (behind the grill) and has a fill range marked on its side.
Finding it would mean you have already located the radiator, typically underneath the engine. Refer to your service manual for directions on precisely locating your radiator and reservoir.
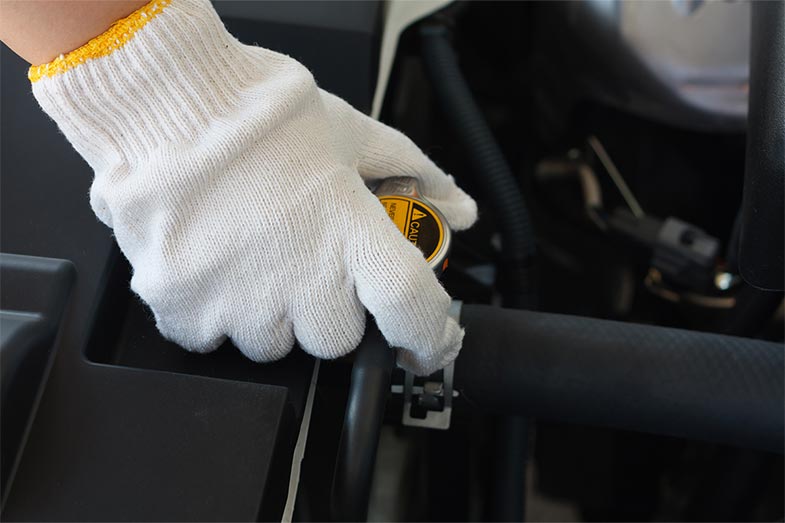
3. Remove the radiator or coolant cap.
Open the hood and find your vehicle’s radiator or coolant cap. These caps usually appear more oval than other circular caps in the engine bay.
Plus, more recent vehicle models have labels on their radiator cap, making it easier to see. Once you spot the radiator/coolant cap, prepare to remove it completely.
Before this step, ensure the radiator or coolant cap is not hot. If it is, do not attempt to open it, as pressurized gas or scalding fluid can forcefully escape and cause severe burns once the cap is lifted off the radiator.
If the engine is a bit cool, make sure to loosen the radiator (view on Amazon) or reservoir cap a little to release trapped pressure (never open the cap abruptly).
When unscrewing the cap, use a rag or thick cloth for extra safety. Also, use gloves and safety goggles to avoid injury, even when the engine is cool.
If the radiator or coolant cap is too tight, pressing down on it when twisting helps get it loose. You may also use a small rubber mat underneath the cloth you are using for extra grip.

4. Drain the old coolant (optional).
In most cases, a refill gets low coolant levels back to spec. It is very seldom that draining the old coolant is required unless it is contaminated or does not have the correct water-antifreeze ratio.
Should you deem it necessary to perform a complete drain, below are the steps (and some tips!) for your reference:
Use jack stands (view on Amazon) to raise and support the front end of your vehicle. Then, place a large drain pan — an oil pan, disposable pail, or bucket used solely for this purpose — under the radiator, and remove the radiator cap (or the pressure cap from the coolant tank if your radiator does not come with one).
Locate your vehicle’s drain cock, and open it by unscrewing. Drain cocks come in the following styles — screw threads, quarter-turn twist, and quarter-turn-and-pull — so it is always wise to turn to your service manual for the specific style your car has.
These drain cocks also become brittle with age and have a higher propensity to break compared to brand-new ones when unscrewed. As a precautionary measure, buy a replacement drain cock from your local auto shop before beginning to drain your engine coolant.
Remove the radiator hose clamp and engine hose to drain the remainder of the engine coolant. Use slip-joint pliers to remove spring-style clamps, pulling the clamp free from the neck.
Buying these hose-clamp piers saves time and prevents bruised knuckles, which can be inevitable with older vehicles. They also make accessing and releasing the lower radiator clamps more manageable.
Reconnect/clamp the radiator hose back together and replace the drain cock after draining the old coolant entirely into the drain pan.
5. Create your coolant mixture.
While many sources say that antifreeze and coolant are interchangeable, they are not. What is coolant in a car? Coolant is comprised of water and antifreeze, whereas antifreeze is one of the two substances needed to make a coolant mixture.
Both elements absorb surplus engine heat and disperse the same through the radiator. However, a coolant mixture is more potent than standalone antifreeze.
You do not necessarily have to create your own coolant mixture. Premixed antifreeze solutions are available at large retail establishments or auto parts stores.
Some manufacturers may require an extended life coolant for some vehicles, which may not be in stock in your local auto shop. If so, make sure to buy it from a dealer and not go for cheaper alternatives that do not fit your car’s needs.
How to put AC/engine coolant in a car
Feel free to mix your own antifreeze solution if you are mechanically savvy. The usual ratio for most vehicles is 50:50 or part-antifreeze-part-water but could change to a 70:30 ratio depending on ambient temperature.
Still, the best (and safest) route to take is to follow the coolant manufacturer’s directions (found at the back of the bottle) for diluting concentrated coolant.
To prevent mineral deposits on the internal engine and radiator surfaces, always use distilled water — never tap water — when mixing the coolant and water thoroughly in a clean bucket. Additional best practices include taking your coolant protection level into consideration when referring to your service manual for the correct coolant mix.
Determining your coolant protection level entails testing your antifreeze’s freezing and boiling points using an antifreeze hydrometer.
Never settle for a universal coolant if there is a scarcity of the specific antifreeze solution you need. Doing so can result in premature component failure and voided car warranty.
Not to mention that these universal coolants are often incompatible with metal alloys, gaskets, and seals found in newer vehicles. There is a very good reason manufacturers are a bit strict about coolant requirements for their vehicles.
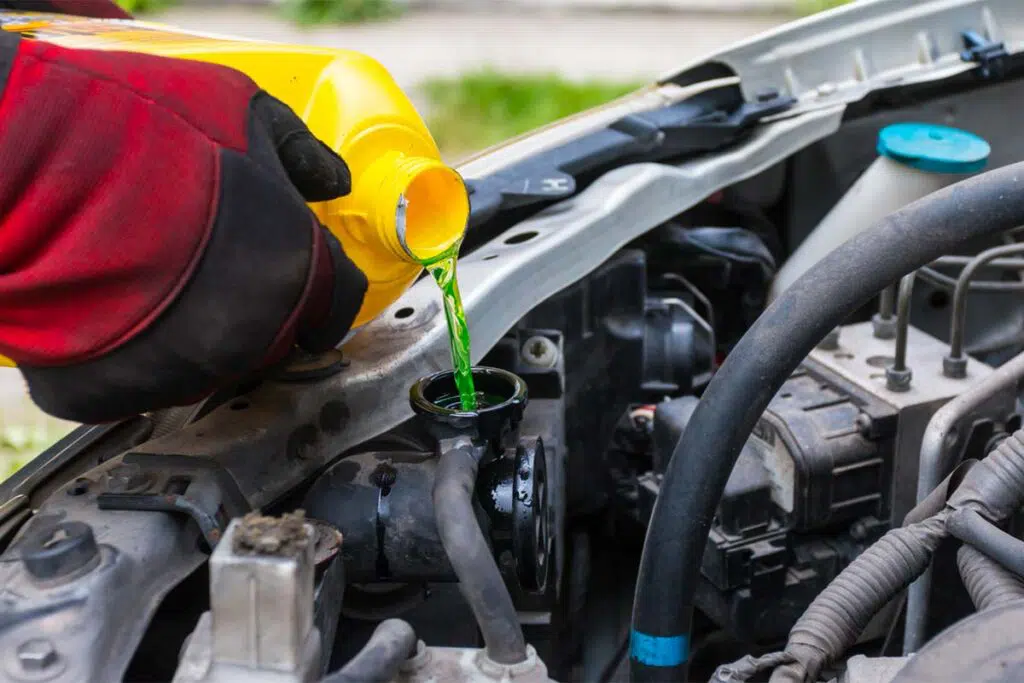
6. Add your engine coolant.
Before adding the coolant, first, check the minimum (MIN) and maximum (MAX) lines found on the side of the overflow tank or reservoir. These markings should tell you where your coolant level is currently at.
If the coolant level is low or near the MIN marking, add the coolant mixture you have prepared earlier up to a few inches below the MAX or full marking on the coolant tank. But if you are pulled to the side of the road when this happens, you can use diluted coolant or pure distilled water (if you are in a pinch).
There is a bit of contestation about where the coolant goes in a car. Ideally, engine coolant should be refilled through the coolant tank and never directly through the radiator itself. But for older vehicles without an overflow tank, it would be alright to top the coolant off via the radiator cap (provided the engine has already cooled down).
If you own an older car and need to take this route, slowly fill the radiator with your coolant mixture up until an inch below the neck of the radiator.
Tip: Raising your vehicle while refilling it with engine coolant reduces air pockets forming in the engine.
Use a funnel to avoid spillage, regardless of whether you are refilling your radiator with coolant in the garage or on the road. This way, you do not get coolant on your skin or have it spill on the floor. Remember that this substance is poisonous, so take extra care.

7. Replace the thermostat and radiator or coolant cap (recommended).
Once you have filled the radiator or coolant tank to the max, screw the cap back on until you hear it click. You should be done at this point, but I advise doing this extra step.
Ideally, you should already have thermostat and radiator/cap replacements even before you start refilling your vehicle with engine coolant – and here is why.
The thermostat is an essential component in your car’s cooling system and the 2nd most prevalent cause of engine overheating when it fails, next to a defective radiator fan. Even if you refill (or flush your engine coolant) repeatedly, recurrences of engine overheating will not be addressed unless your thermostat can regulate engine temperature properly.
Both the cap and thermostat cost less than $30 to change. Plus, it should take less than an hour to change a thermostat on your own unless it is buried.
While you are at it, inspect other cooling system components of your vehicle, such as the blower fan, hoses, belts, sensors, and especially the water pump. Ensure the latter is damage-free and capable of getting the engine coolant flowing.
8. Perform an engine overheating test.
After completing the preceding steps, close your hood and restart your vehicle. Allow your engine to run until the heating/cooling gauge on the dash reaches normal operating temperature and begin overheating inspection. The time you have to wait after refilling may vary.
If it were the other way around (topping up your coolant after driving), the timing would depend on driving speed, time spent on the road, and season.
A quick drive to the nearest 24/7 convenience store would require about 20-30 minutes, while a pass on the motorway at 65 mph would mean at least an hour’s rest for your vehicle. Expect these times to be shorter during colder climates and longer during summer.
Tip: Should you encounter engine overheating while testing your car, turn off the engine, let it cool, and inspect the condition of your temperature gauge, head gasket, or radiator. If you are not technically savvy, have your vehicle checked by a professional mechanic.
9. Double-check the engine coolant level.
When the antifreeze mixture begins circulating inside the car’s engine (during the overheating inspection), more room is freed inside the radiator. That said, it is best to re-check the coolant level after you have taken your vehicle out for a spin and given it time to cool down.
At this point, you would know if you need to add a little bit more of that coolant mixture into the overflow tank or not.
Adding more coolant to bring its level to the top of the radiator or the hot marking on the coolant tank should be pretty straightforward. However, some vehicles may require a particular air bleeding procedure — so, make sure to refer to your service manual.
10. Check for any leaks
Looking for leaks may be customarily done while refilling the radiator with engine coolant. But personally, the best time to check for leakage or kinks would be after all the initial steps in this list have been completed.
Why? Existing leaks are not always discovered when new fluid is added to the radiator. On the contrary, it becomes more apparent when the new coolant has already been subjected to a warmed-up engine.
There are even instances where leaks are never discovered, but signs of low coolant in the car manifest after adding new fluid in. In cases like this, bring your vehicle to a certified mechanic to conduct a thorough inspection of all internal and external systems.
These include all passages circulating the coolant around the engine and locating the source of the leak. Anything squishy, damaged, or swollen should be replaced.
Dispose of old/used engine coolant properly. Never flush it down a sink unless your home drainage connects to your locality’s sewer or wastewater system.
Instead, pour it into a screw-cap plastic container and drop it off at the nearest treatment plant or recycling center. For recommendations on proper coolant disposal, reach out to your local government unit or a local auto shop.
Remember — neither storm drains nor your lawn is proper avenues for disposing of used coolant.
Vacuum-filled Cooling System
Compared to a conventional vehicle, a car with a vacuum-filled cooling system uses an air compressor (view on Amazon) and an air-powered refill tool. The dynamics of adding coolant to the car are pretty much the same, except for the part where you have to jam the fill tube into the coolant bottle and let the vacuum mechanism suck fresh coolant into the cooling system.
Another beauty with this process is that the vacuum already sucks out air pockets as it refills your vehicle’s radiator.
How to Check Coolant in Your Car
Steps to check the coolant in your car are in step #6 of this guide. However, there is more to it than just inspecting coolant levels.
The appearance of the engine coolant is also important, as it will indicate if following the usual 10-step process is enough or doing a drain or radiator flush is needed.
Engine coolant is usually red, green, blue, or yellow, each color having its corresponding use. Ford sets a perfect example by offering color-coded engine coolant for specific model years of its vehicles.
Tier systems may not apply to all vehicle manufacturers. Hence, visual inspection of the engine coolant seems to be a more reliable method.
If the fluid is colorless, looks rusty, or has particles floating in it, flushing your cooling system is required. These signs signify corrosion of internal components resulting from a long-overdue coolant change. Moreover, they are an indication that the radiator has been filled with mixed types of coolant in the past.
Conversely, if the coolant appears to have a sludgy or oily surface, professional servicing by a mechanic is a must. In this specific situation, the culprit is most likely an internal head gasket leakage — and only professional mechanics have the appropriate equipment to conduct the needed checks.

Different Types of Antifreeze
Because it is imperative to use an engine-compatible coolant, it makes absolute sense to learn more about the various types of antifreeze — this way, you can decide which is most suitable and safe for your vehicle.
Inorganic Additive Technology
Inorganic Additive Technology is manufactured using ethylene glycol (with phosphates and silicate) and is typically colored green.
While these ingredients perform excellently in preventing engine corrosion, they are less efficient in removing debris than newer antifreeze brands. Hence, clearing the reservoir completely before refilling is strongly advised.
Organic Acid Technology
Organic Acid Technology is another coolant made using propylene glycol and is usually in orange. Volkswagen and GM patrons claim that this antifreeze technology works best with their vehicles.
Whether or not this is accurate will depend on manufacturer recommendations — so, make sure to refer to your service manual before adding this variant to your overflow tank.
Hybrid Organic Acid Technology
This technology combines the first two types due to its organic-acid-and-silicate composition. Depending on the brand, it can come in yellow, orange, pink, or blue.
Because of its many varieties and corrosion-prevention properties, it is highly recommended for use on most European cars like Ford and Chrysler.
Phosphate-Free Hybrid Organic Acid Technology
This technology is more commonly called HOAT and is a type of antifreeze with a beautiful turquoise color. Like most variants, it is made with glycol and possesses organic and inorganic corrosion inhibitors.
More importantly, it offers excellent protection for seals and gaskets (among others) against premature wear and corrosion. The likes of Mercedes, Jaguar, Saab, and Porsche (to name a few) claim this antifreeze technology works splendidly with their vehicles.
Phosphated Hybrid Organic Additive Technology
This technology is made of corrosion inhibitors like phosphates and carboxylates. Depending on the brand, it comes in either blue or pink.
This antifreeze variant is widely used in vehicles manufactured in Asian countries and other locations where the climate is warmer since it resolves heat transfer issues well.
Silicated Hybrid Organic Additive Technology
This technology is usually bright purple and is an antifreeze type made with silicates that boast engine-corrosion-prevention properties. This variant is free from nitrates, borates, phosphates, amines, and imidazole — substances considered by some engines to be harmful.
Moreover, it is reportedly compatible with Bentley, Audi, and Lamborghini automobiles.
Frequently Asked Questions
What temperature should the coolant be in your car?
On average, most vehicles can process coolant temperatures between 160 °F and 225 °F. If temperatures are cooler than this range, the engine will run rich and efficient combustion will be compromised. If the temperature is higher, the engine may start to overheat.
How often should I put coolant in my car?
Top it up periodically or every time coolant levels are not up to spec to avoid overheating the engine. When doing a full coolant flush and replacing it, the timing is different.
While some car owners rarely change their engine coolant, most experts recommend doing so every 30,000 to 70,000 miles.
Other vehicles may even take longer than 70,000 miles before needing a coolant flush/change. Some institutions, like Prestone UK, suggest checking your engine coolant/antifreeze at least every two weeks.
But again, coolant change intervals depend on the amount of driving you do and the weather.
Can I put engine coolant in my car while it is running?
Yes, this is deemed safe, especially in most modern cars. However, take note to refill or top up your engine coolant via the remote expansion/overflow tank and not through the radiator cap.
Should the car be cold to add coolant?
It is better to wait until your car’s engine is cold or have sat for at least three hours. But in typical situations, the engine should be cool (or warm at most) before adding coolant to the radiator.
Never attempt to add coolant to the radiator if the engine temperature is hot, as there is a big chance pressurized water can escape from the reservoir when you unscrew the coolant cap. The hot, pressurized water can very likely scald your skin.
Is a 50:50 engine coolant mixture necessary when refilling your coolant reservoir?
For this query, I will answer by way of comparison. If only pure water were used as a coolant, it would immediately freeze the moment the temperature falls below 32 °F, not being able to circulate through the engine as a result. Similarly, the coolant would crystallize at 0 °F if only pure antifreeze were used.
Pure antifreeze (mostly made of pure ethylene glycol) does not have enough heat capacity, lowering the heat-transfer capabilities of your vehicle’s cooling system by an average of 35% (or more in hot weather).
When not mixed with water, it loses its protective properties and can make the engine more prone to overheating and its parts susceptible to corrosion.
That said, using a 50:50 antifreeze-water mixture is indeed necessary when replenishing your coolant levels. Water mixed with antifreeze lowers the coolant’s freezing point to approximately -35 °F.
Furthermore, it keeps performance additives like silicates and phosphates suspended in the mixture, not settling to the bottom of the cooling system and causing a whole range of problems.
Distilled water versus tap water is always best to use when creating your coolant mixture, as the former does not contain minerals that can form deposits in your vehicle’s cooling system passages and radiator.
In dire circumstances where you have an overheated engine and adding pure water to your radiator will help get you home, putting water in your car instead of coolant is permitted. However, refrain from doing this repeatedly or for longer than necessary.
What if you use the wrong type of coolant?
Since engine coolant is chosen for its compatibility with materials used in a car’s engine, using the wrong type will damage the engine and internal cooling system components. For instance, engines with cast iron blocks will need a coolant with specific additives to minimize corrosion.
Those with aluminum blocks will require a coolant with different additives and, therefore, cannot interchange.
The same can be said for radiators made of plastic components, which will not work with plasticizers – a kind of additive that softens plastic. Mixing other types of coolant (especially those that are not OEM-recommended) can also lead to sludge formation or speed up corrosion.
The bottom line is that not adhering to manufacturer-recommended coolant can cause engine problems and high vehicle expenses down the road.
Conclusion – How to Add Coolant to Car
To summarize, here are the 10 steps on how to put coolant in your car:
- Let the engine cool down after turning off the vehicle.
- Find the radiator or coolant reservoir.
- Remove the radiator or coolant cap.
- Drain the old coolant (optional).
- Create your coolant mixture.
- Add your engine coolant.
- Replace the thermostat and radiator or coolant cap (recommended).
- Perform an engine overheating test.
- Double-check the engine coolant level.
- Check for any leaks.
The advice provided in this guide and the instructions in your service manual help ensure that adding coolant to your vehicle is a breeze.
You may need to be mindful of signs of low coolant levels in your car and how your engine fluids look like and do the occasional radiator drain/flush. But in return, you will be guaranteed riding comfort and an optimal (not to mention worry-free) vehicle performance.
Kris is an avid off-roader and outdoor enthusiast who loves to brave the elements and take on challenging terrain. He also enjoys sharing his passion and knowledge with others so that they, too, can appreciate the ride.
About Kris